Brightspace FAQs for Faculty
Here you can find frequently asked questions and answers regarding Brightspace.
If you cannot find an answer to your question in the list below, Google it or write an email to us. We'll find an answer for you.
- My students cannot access a discussion topic although I made it available
- How can I hide content modules or submodules and release them later
- How can I release the Final Calculated Grade to my students
- How to reduce cheating in Quizzes
- How to submit a quiz that is "In Progress"
- How to clear an attempt for a quiz
- How to give special need students more time in quizzes
- How to regrade a quiz after you changed the correct answer in a question
- What can be restored in a course by the instructor and how
- How to extend end time for special need students in Discussion Topic
- How to enroll a user in an organization
- What these icons next to my assignments or quizzes mean
My students cannot access a discussion topic although I made it available
First, ask yourself where your discussion topic is linked. Is there a link to the discussion topic in a Content module page?
If NO, then go to the Discussions page from the navbar. Click the down arrow next to the discussion topic that students cannot see and select Edit Topic. Check Start Date, End Date as well as their respective Visible with access restricted settings. If they are all correctly set, check Release Conditions to see if you have set any relase condition.

If YES, that is, you added a link to the discussion topic in one of your Content module page, then go to that module page. Check if you added an Available date/time and Due date/time for the link. If they are not the same as those you set on the Discussions page, you need to modify them. The best way is to set these dates/times in one place, either set them in the content module page where you add the link or on the Discussions page for the discussion topic.

How can I hide content modules or submodules and release them later
In Brightspace, although you set a Start Date in future for a content module or submodule, the students can see the list of item/assignment names in that content module or submodule before the Start Date. But they cannot access them.
If you want to hide all items/assignments including names in a folder, you have to hide that content module or submodule and make it visible in the date when you want students to access it. Below you can find how.
Go to the content module or submodule page. Click the down arrow next to the module name and select Hide from Users.

On the date and time when you want students to access it, go to that content module or submodule page again. Click the Down arrow and select Make Visible to Users.

How can I release the Final Calculated Grade to my students
How to reduce cheating in Quizzes
Although we cannot prevent students from cheating 100%, some settings in quizzes shown below can reduce the chances of cheating.
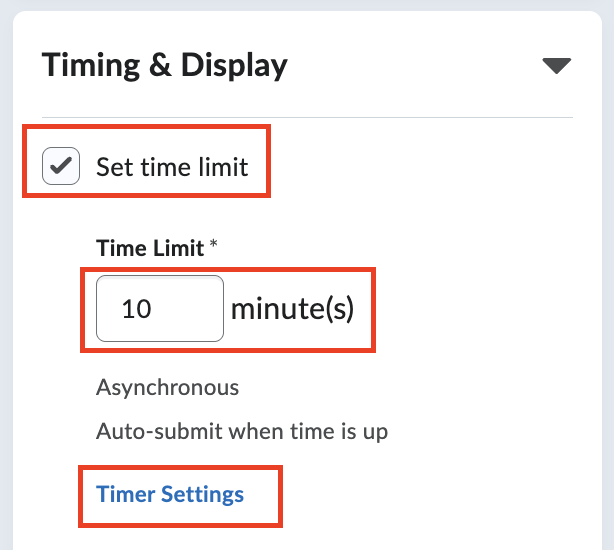
Limit the time of the quiz and enable auto-submission
On the Edit Quiz page, expand the Time & Display panel. Check the box for Set time limit and fill in the appropriate number of minutes. Next click Timer Settings.
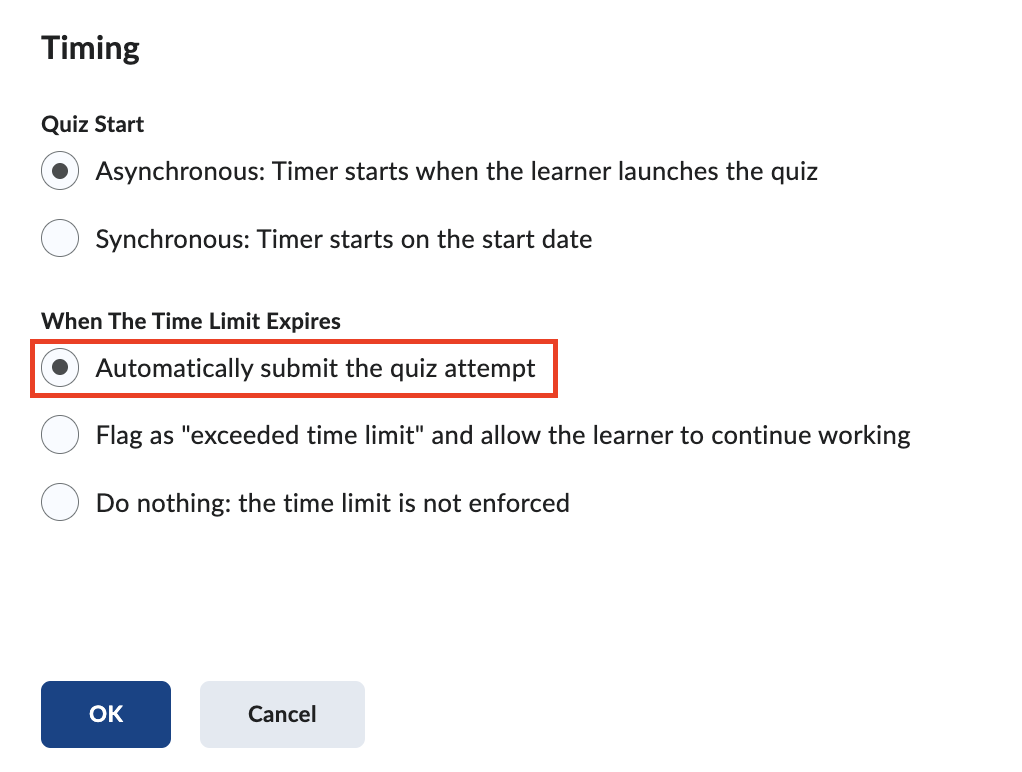
On the pop-up dialogue box, under When The Time Limit Expires, select Automatically submit the quiz attempt. Then click the OK buton to save.
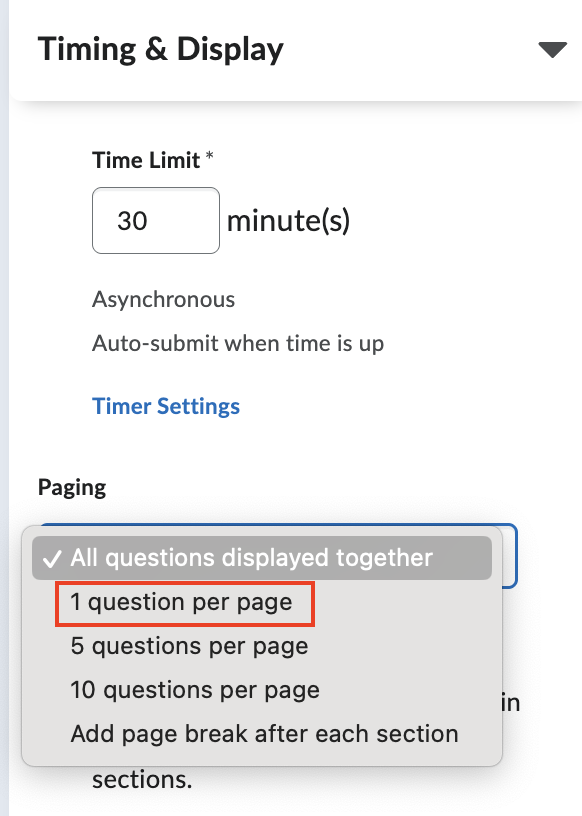
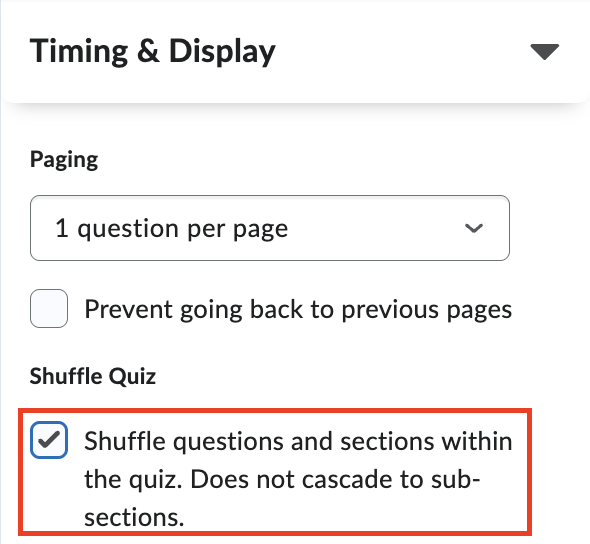
Display one question per page
In the Time & Display section, click the dropdown under Paging and select 1 question per page.
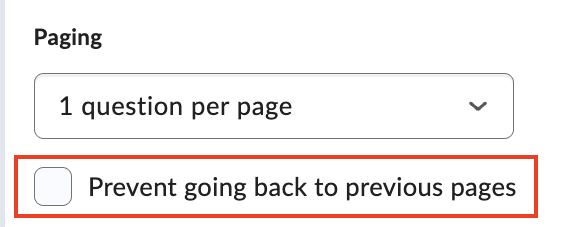
You can decide whether allowing students to go back to previous pages after selecting 1 question per page.
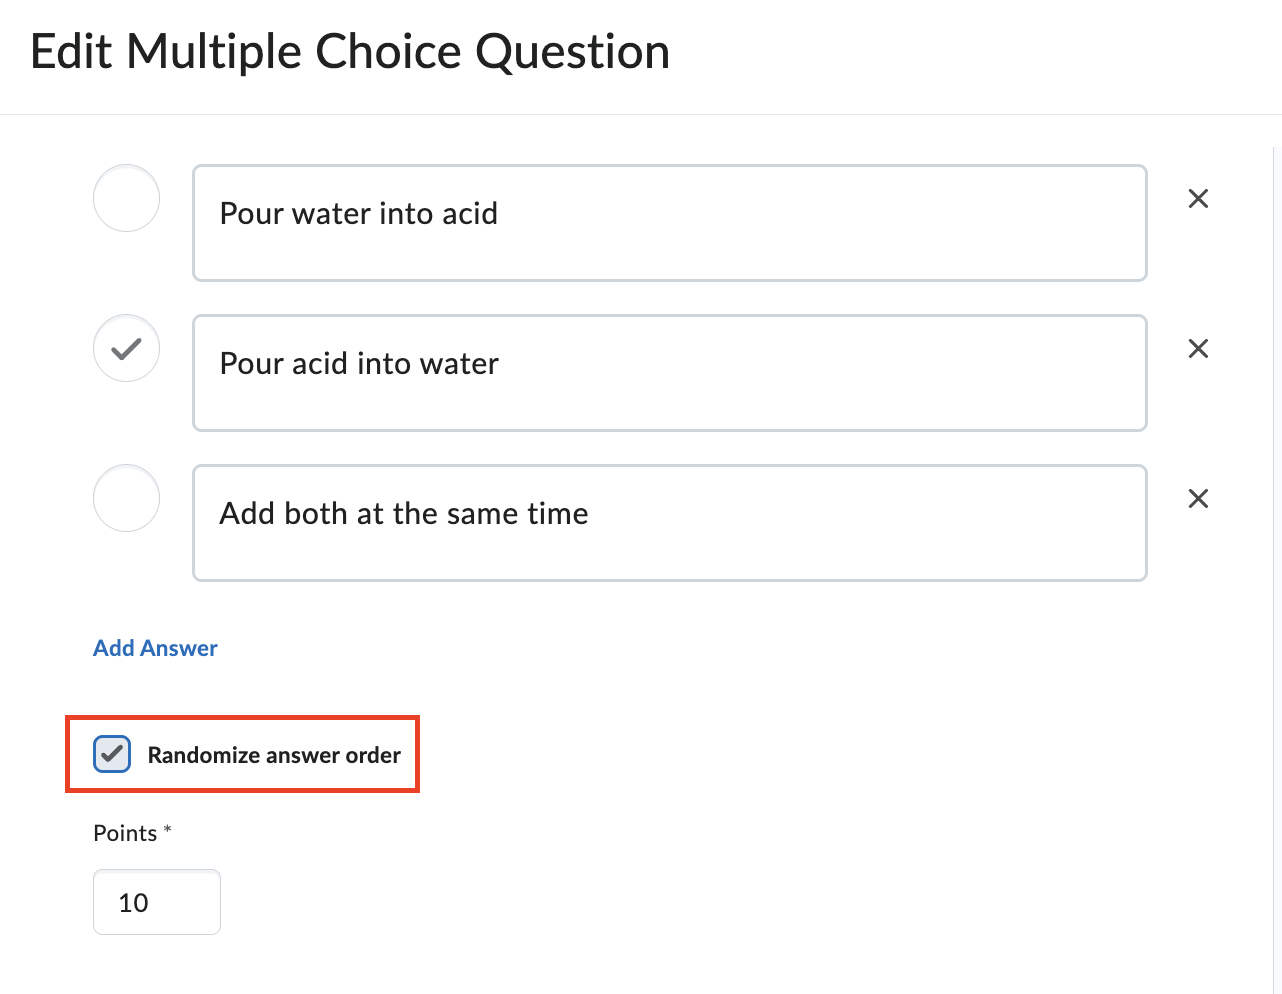
Randomize answers
When creating or editing a quiz question such as multiple choice, true or false, check the box for Randomize answer order.
Randomize questions
In the Time & Display section, check the box for Shuffle questions.
Use question pools
Follow the tutorial linked below to distribute different questions to different students. It is an effective way to reduce the opportunity for students to compare their answers in quizzes.
Creating a quiz that distributes different questions to different students
How to submit a quiz that is "In Progress"
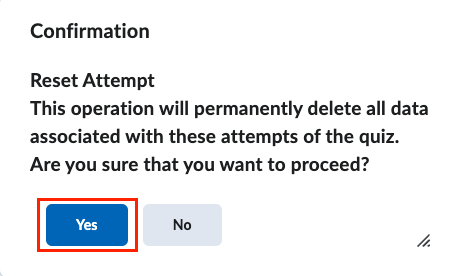
How to clear an attempt for a quiz
1. On the top navigation bar, click Quizzes.
2. Locate the quiz you wish to reset, click the drop-down icon next to it, and select Grade from the menu.

3. Find the student’s attempt that needs resetting, check the box next to it, and click Reset.
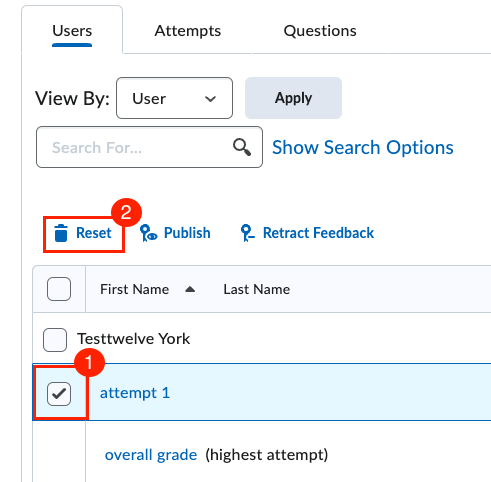
4. Confirm the reset by clicking Yes in the confirmation pop-up.
How to give special need students more time in quizzes
There are 2 methods to give more time to special need students in quizzes/exams/tests. The first one described below is to give more time to a student in all quizzes/exams/tests. The second one is to give a student more time in a specific quiz. This feature also includes allowing a student to take the quiz in a different date/time, or to have more attempts.
Method 1: Give more time to a student in all quizzes
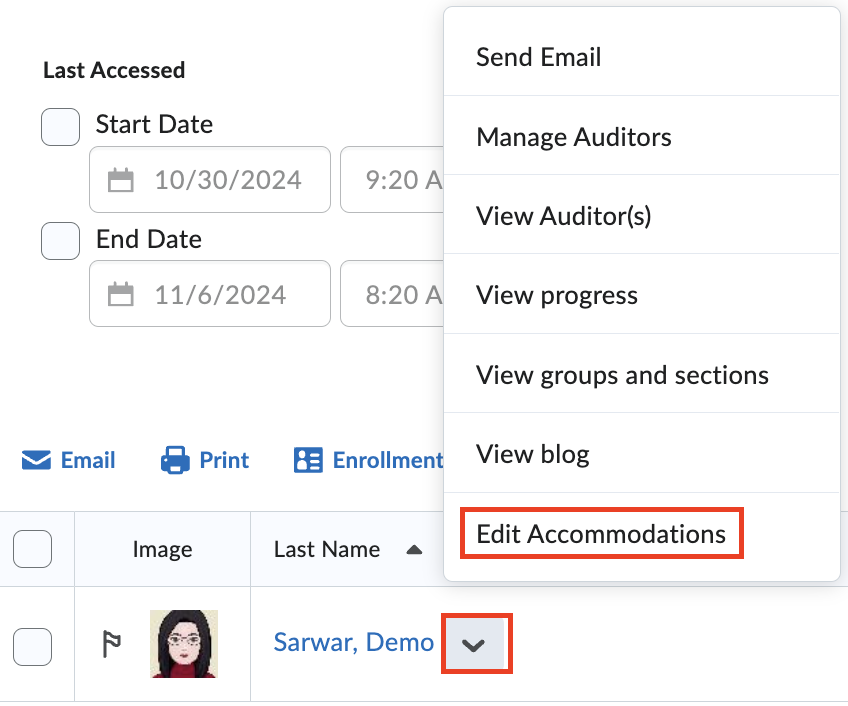
1. Go to Course Admin > Classlist. Click the down arrow next to the student's name and select Edit Accommodations.
2. On the pop-up box, check the box for Modify Time Limit. Then, fill in a number for Multiplier of original quiz time or a number of minutes for Extra time. Click Save.
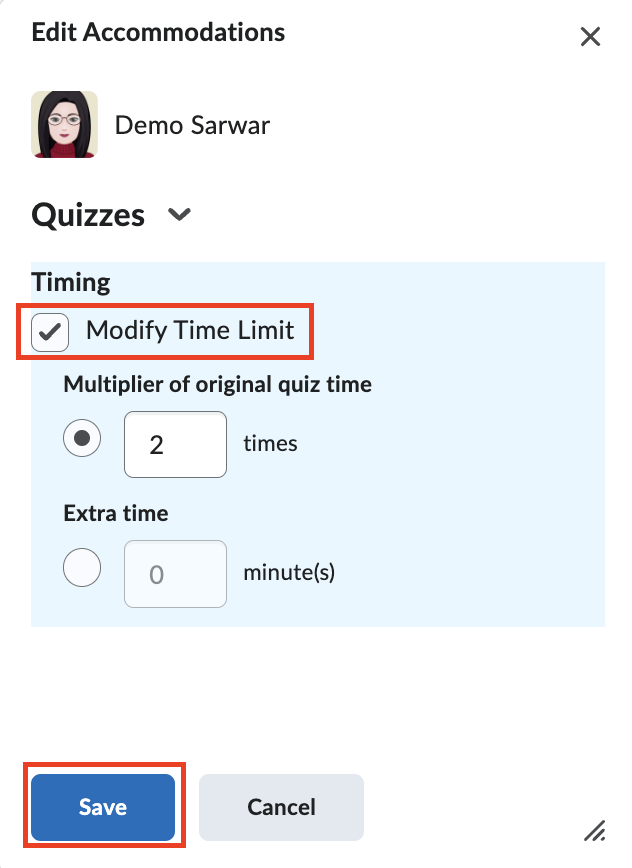
Now the student will get more time in all quizzes/exams/tests in the course.
Method 2: Give more time to a student in a specific quiz
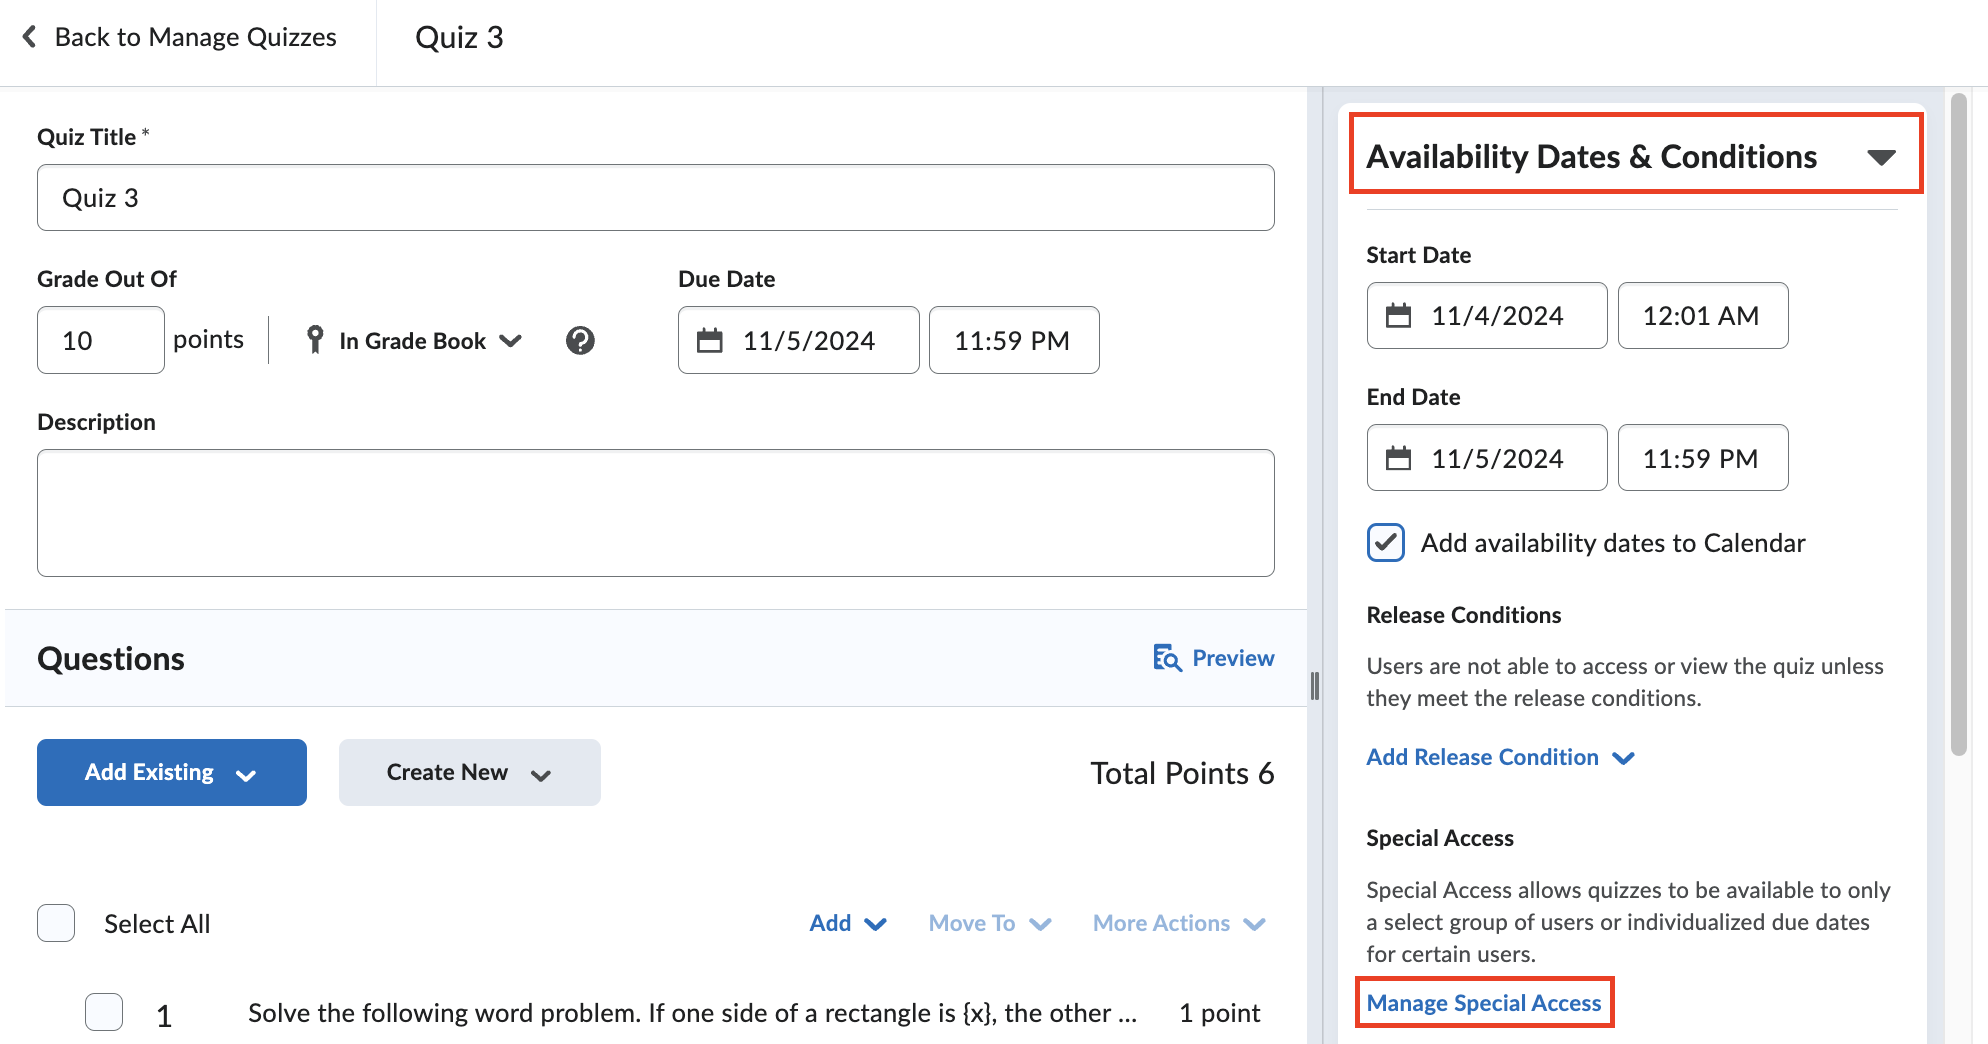
1. Go to Quizzes page from the course navbar. Click the quiz for which you want to give a student more time.
2. Expand the Availability Dates & Condititions panel by clicking on it. Fill in the Start Date and End Date. Then, click Manage Special Access.
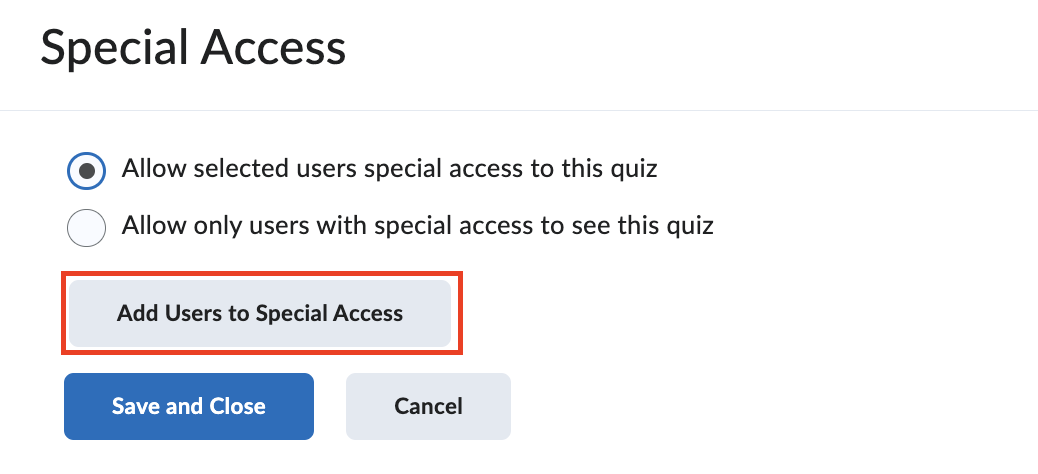
3. On the pop-up Special Access box, click Add Users to Special Access.
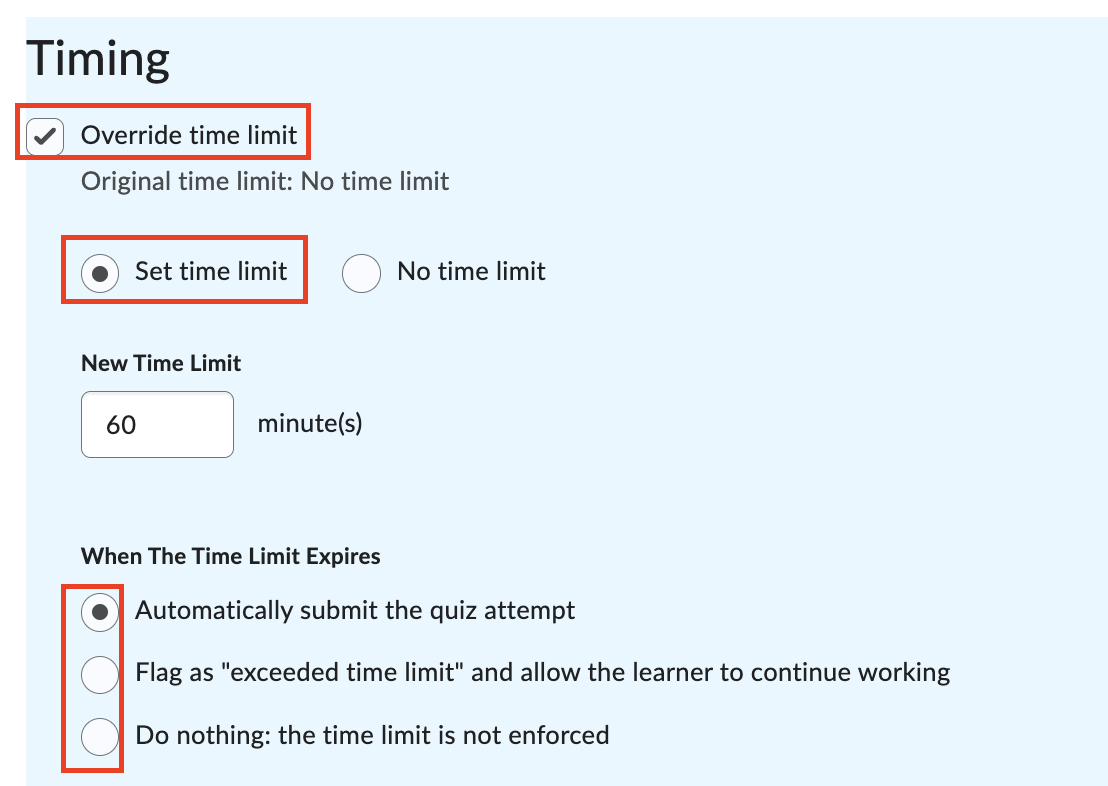
4. Check the box for Overide time limit. Then click the radio button for Set time limit. Fill in the New Time Limit in minutes. In the When The Time Limit Expures section, select the desired action.
5. If you want to give students a different date/time slot to complete the quiz/exam/test, in the Properties section, check the boxes for teh 3 dates and enter the desired dates and times.

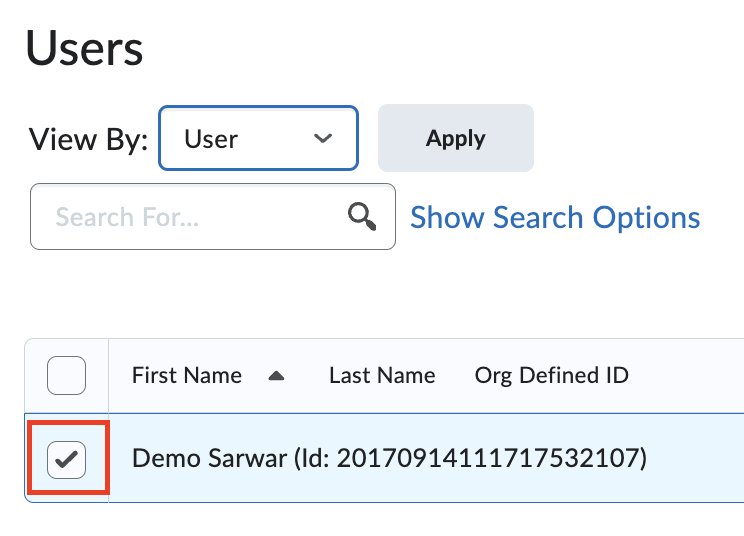
6. In the Users section, check the box next to the student who needs extra time or a different date/time slot.
7. Click the Save button at the bottom. You are back to the Special Access page.
8. Click Save and Close botton.
Now the student will have more time for the quiz/exam/test.
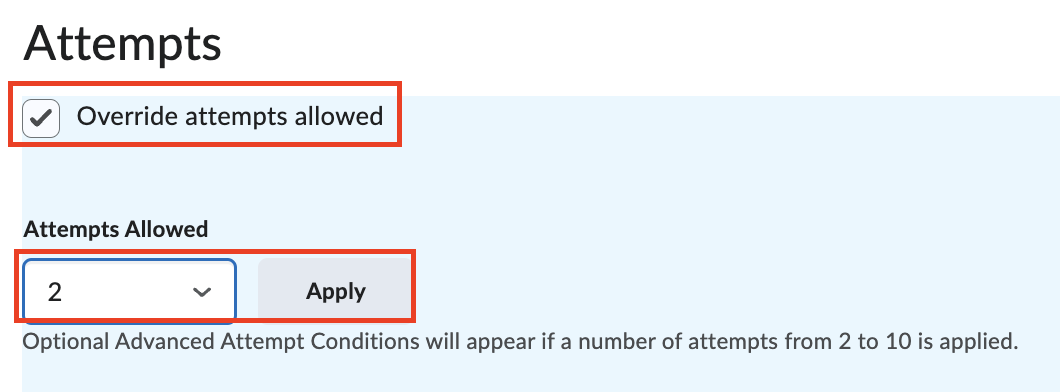
If you need to give a student a second or more attempts, after completing the above step 6, in the section Attempts, check the box for Override attempts allowed, and select a number of attempts you want to give in the dropdown box, then click Appy.
Afterwards, continue with steps 7 and 8.
How to regrade a quiz after you changed the correct answer in a question
Step 1: Correct the Quiz Answer for Future Attempts
To ensure that future students (or future use of the quiz) are scored accurately, start by correcting the answer on the quiz itself.
- Go to Quizzes on the top navigation bar, find the quiz, and click the down arrow next to its name. Select Edit.

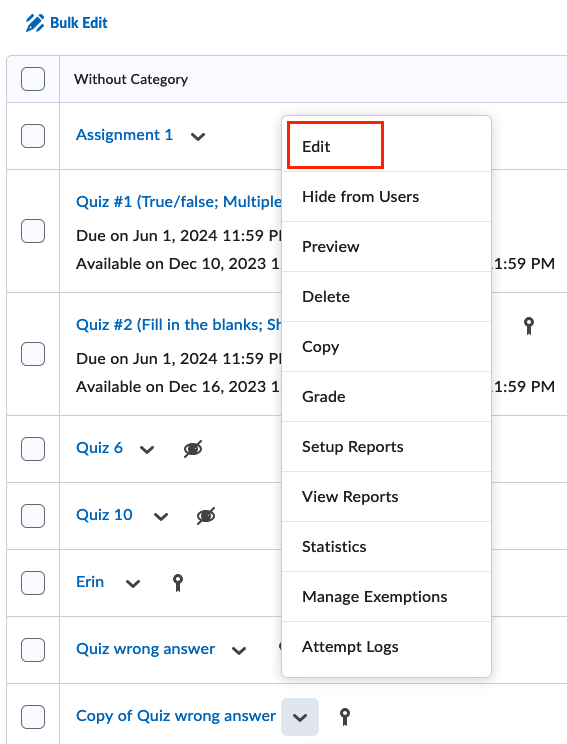
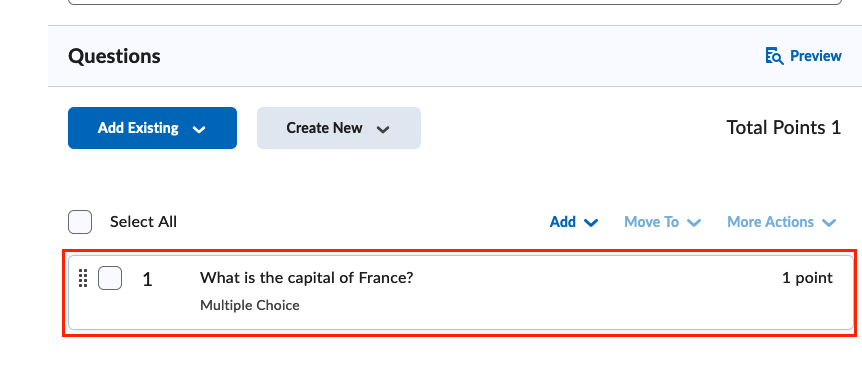
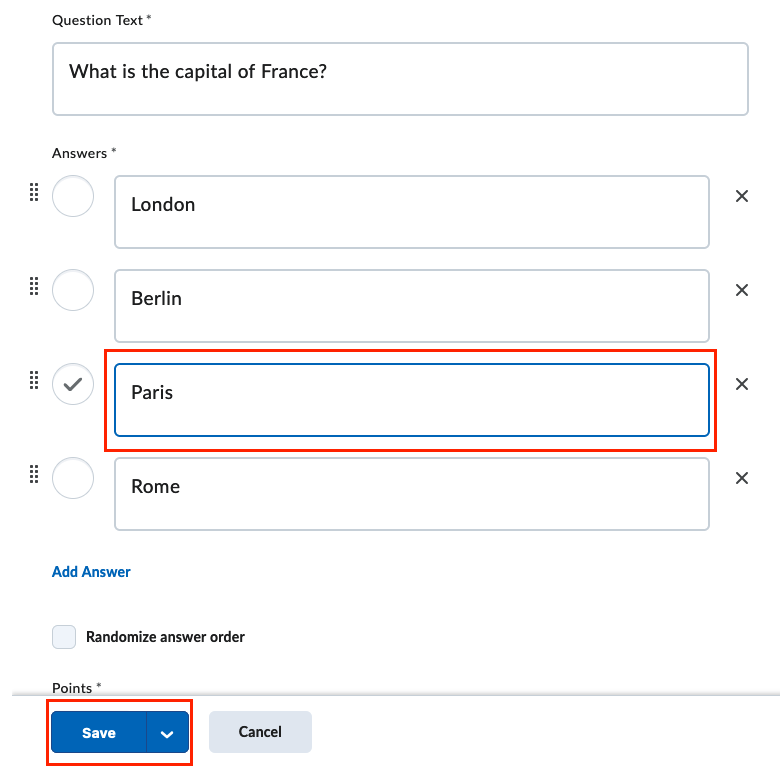
2. In the Question section, click on the question that needs correction. A window will pop up, allowing you to select the correct answer. Make the change, click Save, and then Save and Close.

Step 2: Regrade Existing Attempts
Now, adjust the grades for students who already took the quiz.
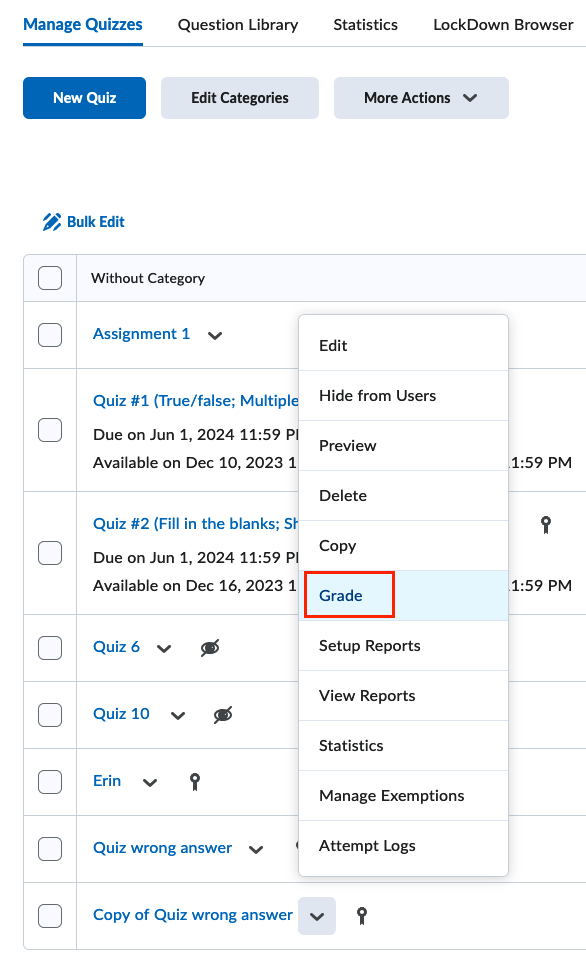
- Next to the quiz name, click the down arrow again and select Grade.
2. Click on Questions and then select Update All Attempts. Click on the question you corrected.
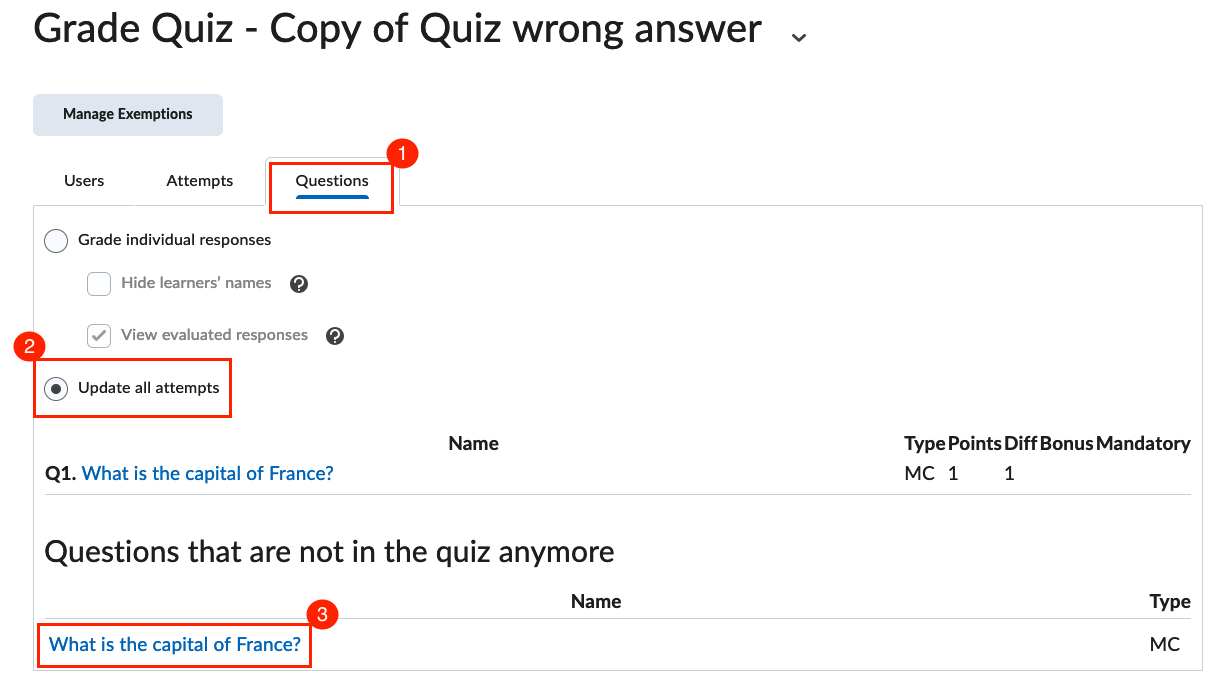
3. A window pops up displaying the question, answers, and students' attempts. Here you want to assign the credit to the students who chose the correct answer, and assign 0 to those who gave the wrong answer that was marked as correct before you made the correction to the quiz question. In this window:
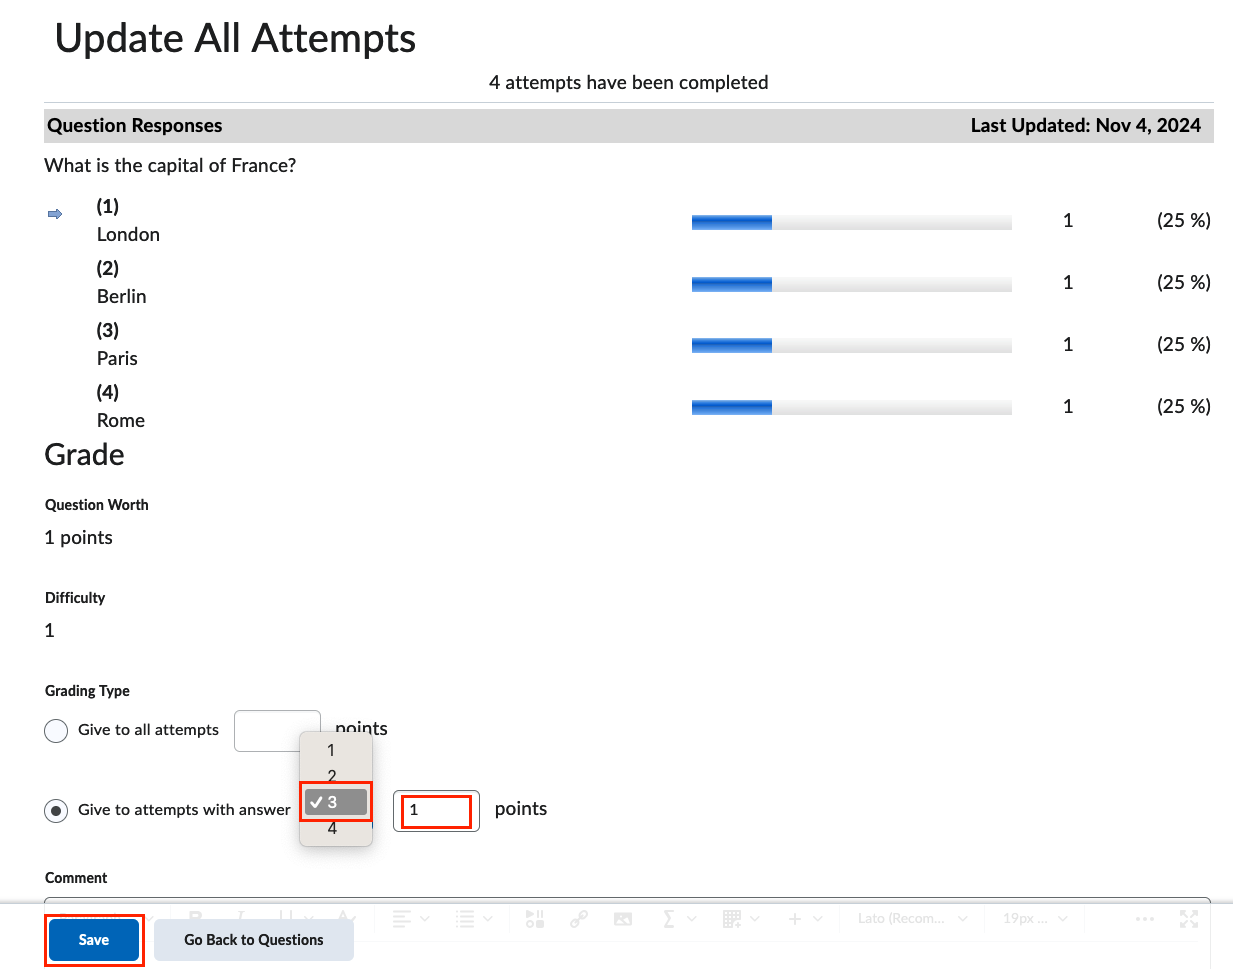
- Select Give to attempts with answer radio button and then from the dropdown choose the question number corresponding to the correct answer, assigning a score of 1 or whatever the score you set for that question. Click Save to apply the change.
- Afterwards, select Give to attempts with answer radio button again and then from the dropdown select the question number that is the wrong answer but origianlly was marked as the correct answer. Assign 0 point. Click Save to apply the change.
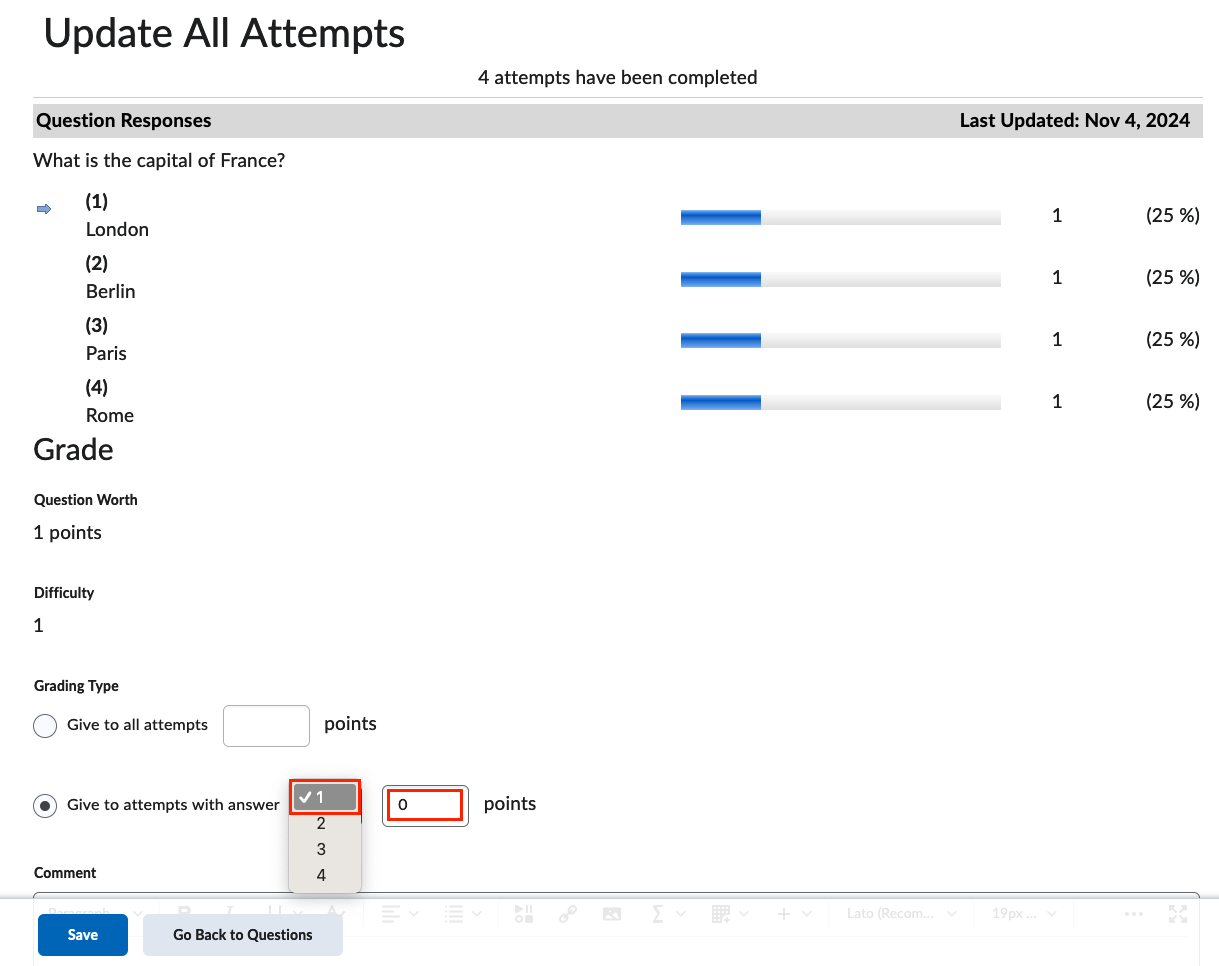
Now the quiz grades are updated correctly.
What can be restored in a course by the instructor and how
Brightspace allows administrators or instructors with the required permissions to restore deleted course items at any time, regardless of how long they have been removed. As an instructor, you can restore the following items:
- Restore deleted discussions
- Restore deleted assignments and Restore deleted submission
- Restore a deleted grade item
- Restore a deleted Announcements item
- Restore a deleted Org Unit
- Restore an agent (e.g. intelligent agent)
- Restore a deleted quiz
For more details on how to restore these items, click on the link below
How to extend end time for special need students in Discussion Topic
This guide will show you how to extend the end time for special needs students in a discussion topic on Brightspace, ensuring they have the additional time needed to participate fully. It involves two parts. The first part is to create a group for the special need student. The second part is to set up the time extension.
Creating a group for the special need student
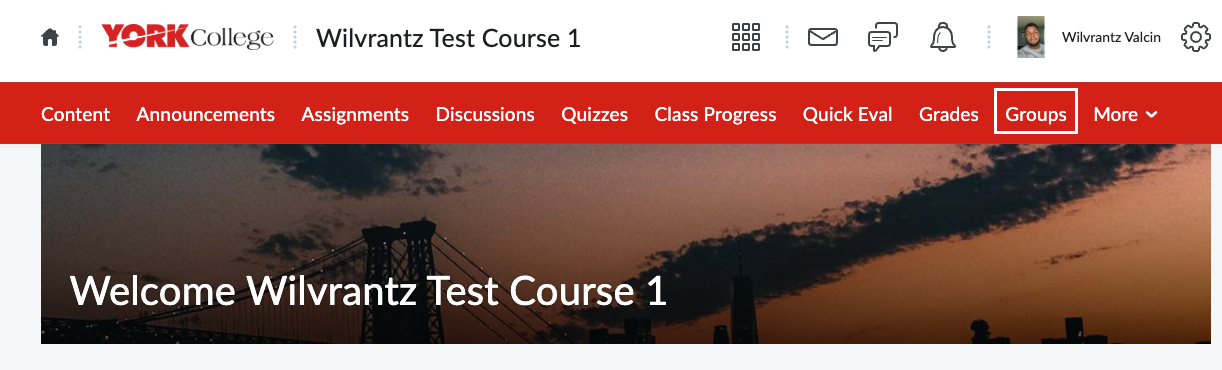
1. Navigate to the top navigation bar and click on Groups.
2. On the Groups page. Click on New Category.
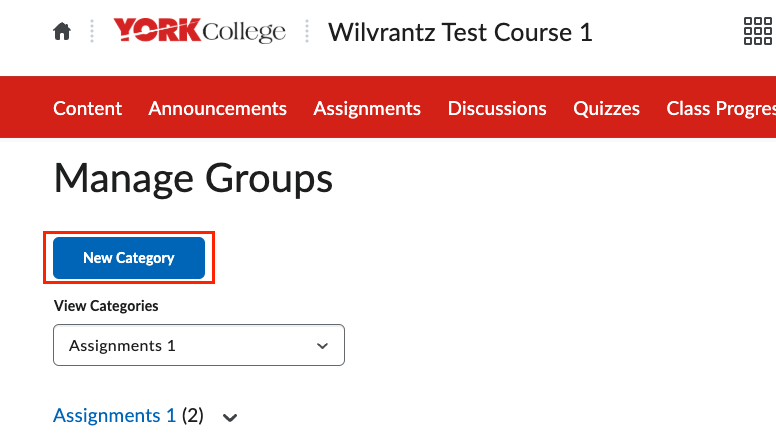
3. On the New Category page, fill in the Category Name. Under Enrollment Type, click the down arrow and select # of Groups - No Auto Enrollments. In the Number of Groups field, enter the number of groups needed (e.g., 1 for a single student or more for varying extensions). You can always add froups later. Then, click Save.

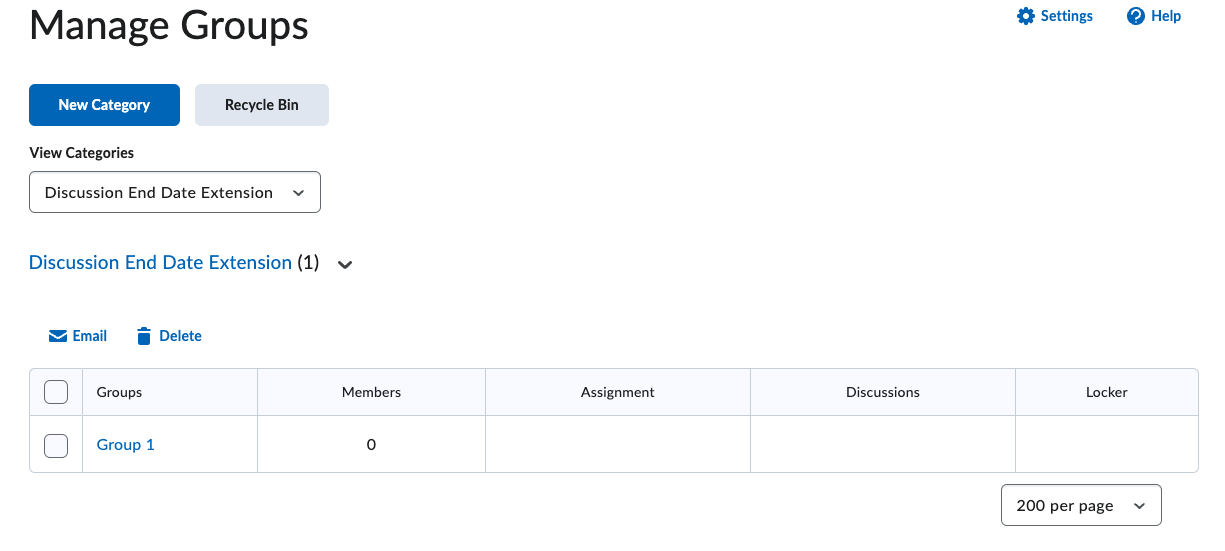
4. After saving the category, you will be directed to a page where you can manage the groups.
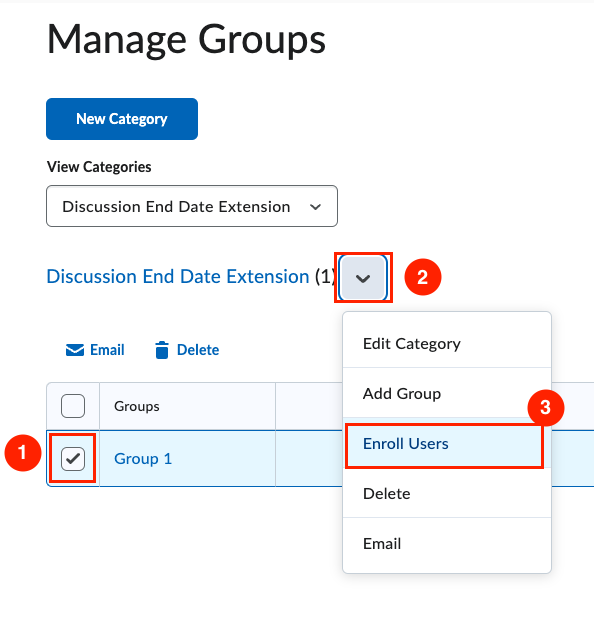
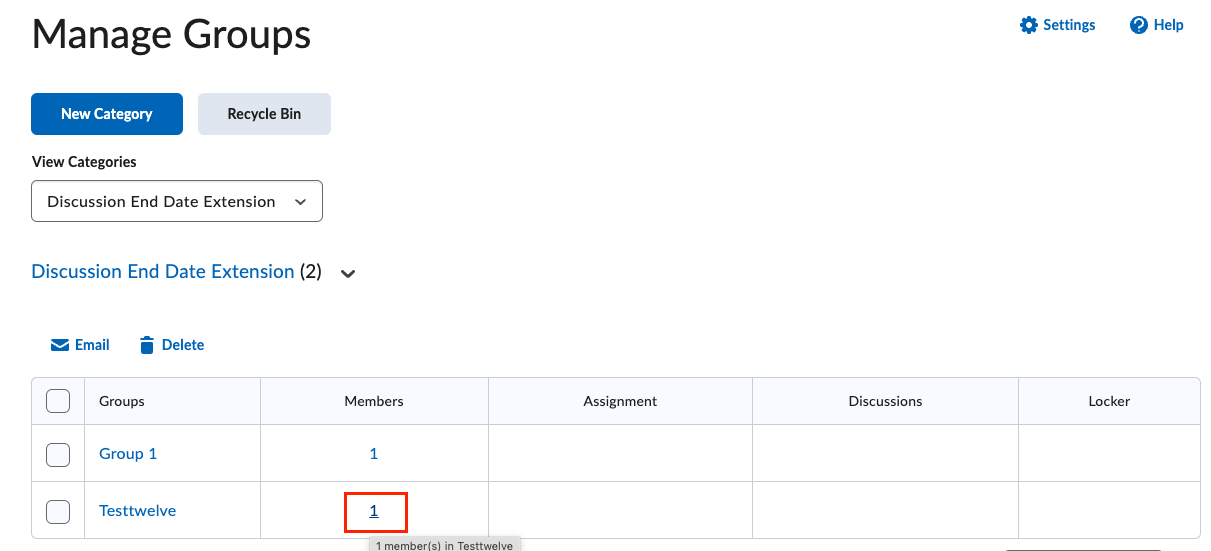
To enroll a student, check the checkbox next to the group name, click the down arrow next to the category name, and select Enroll Users.
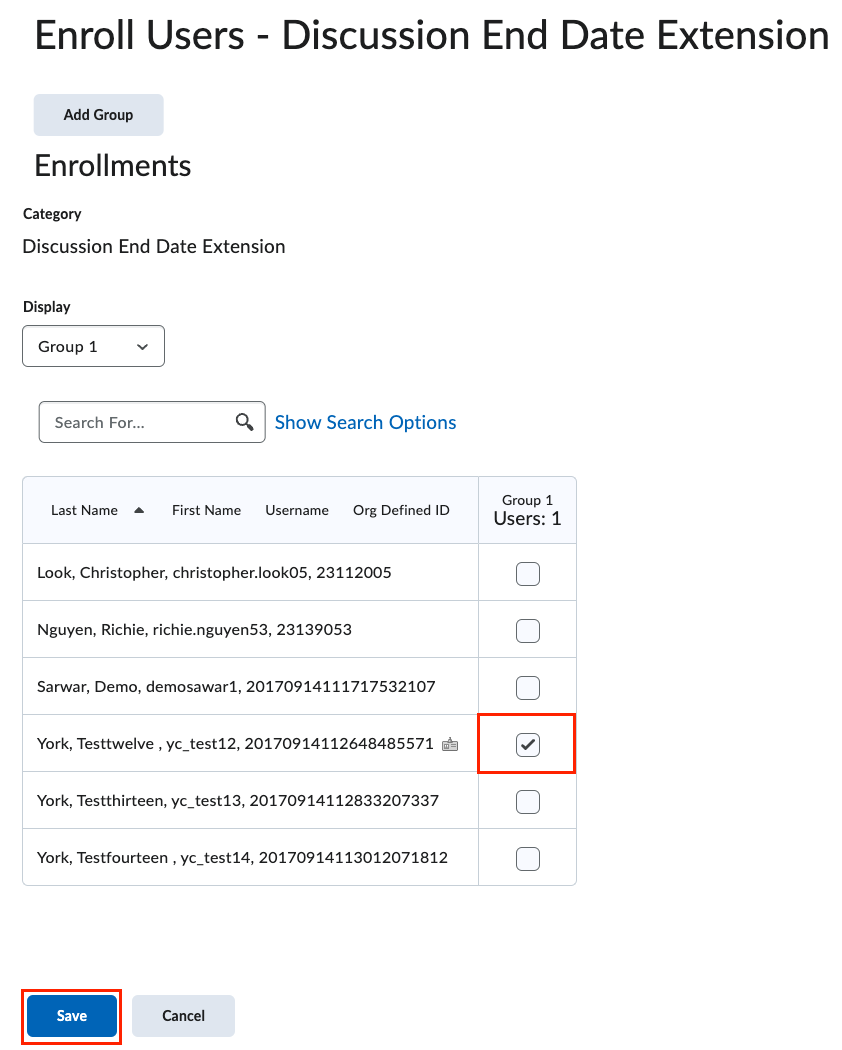
A list of all students will appear. Check the box next to the student you want to enroll and click Save.
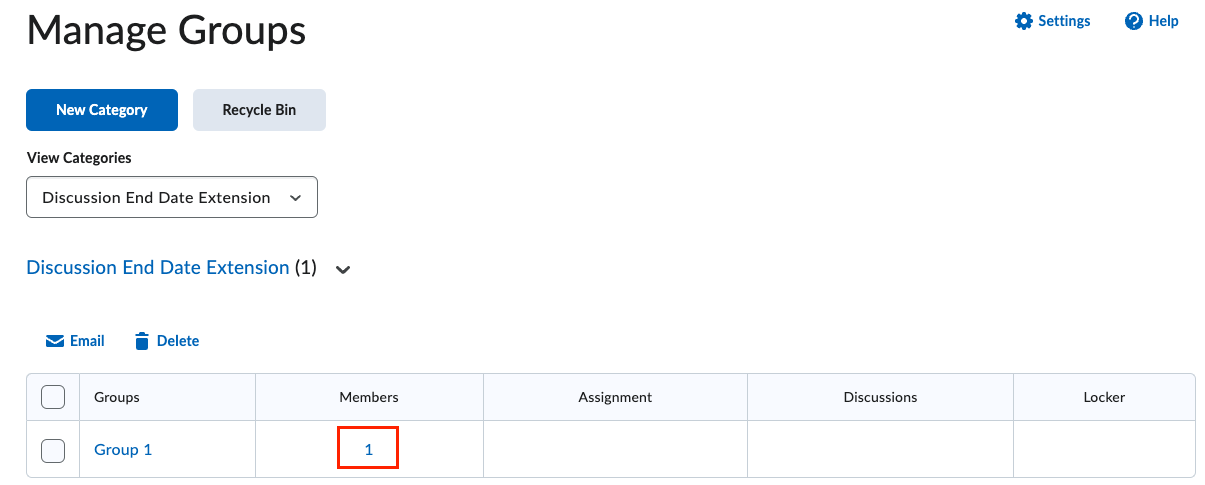
After clicking Save, you will be redirected to Manage Groups, where you will see the number of students added under Members, in this case, just one student.
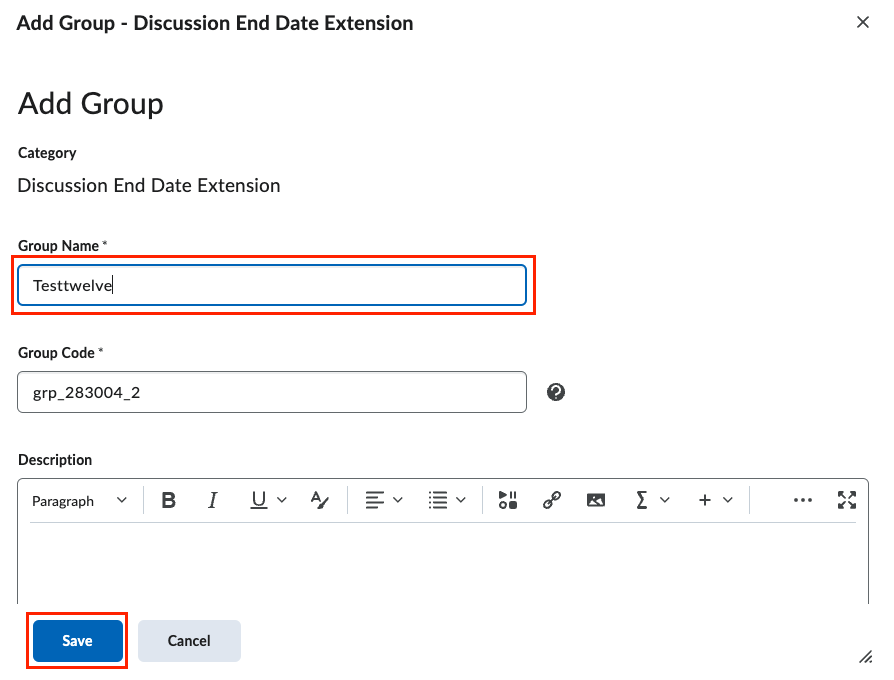
4. If you have students with different extension dates, click the down arrow next to the category name and select Add Group.
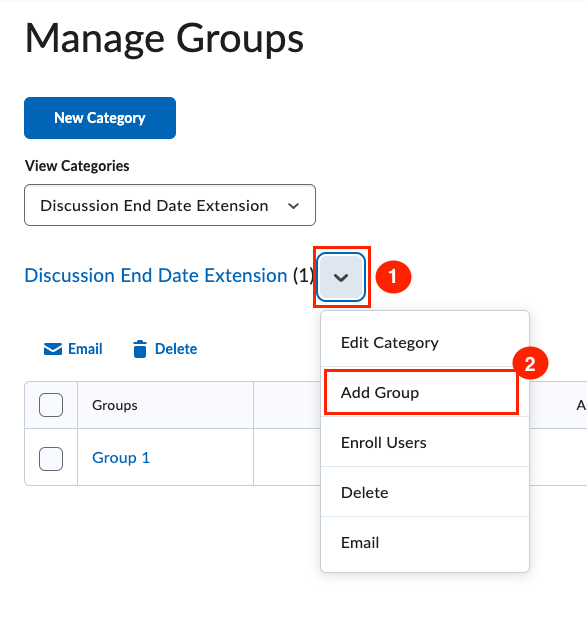
A window will appear where you can optionally rename the group (e.g., using the student's name for easier management). Then, click Save.
After clicking Save, you will be redirected to Manage Groups, where you will see the newly created group.
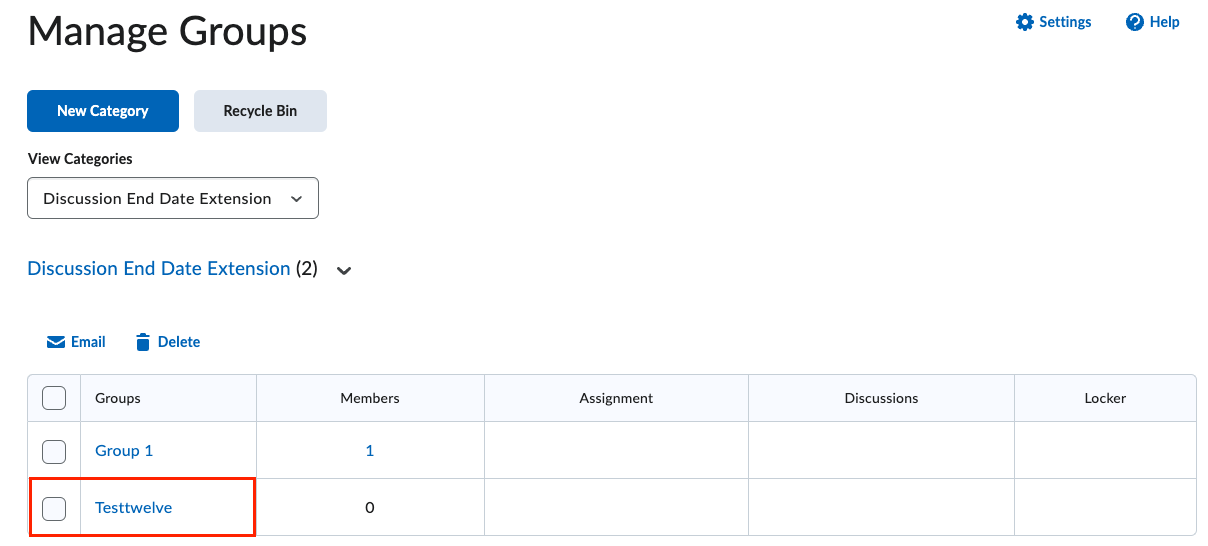
Repeat the same steps as above to enroll students in this newly created group.
Setting up time extension for the group of special need student(s)
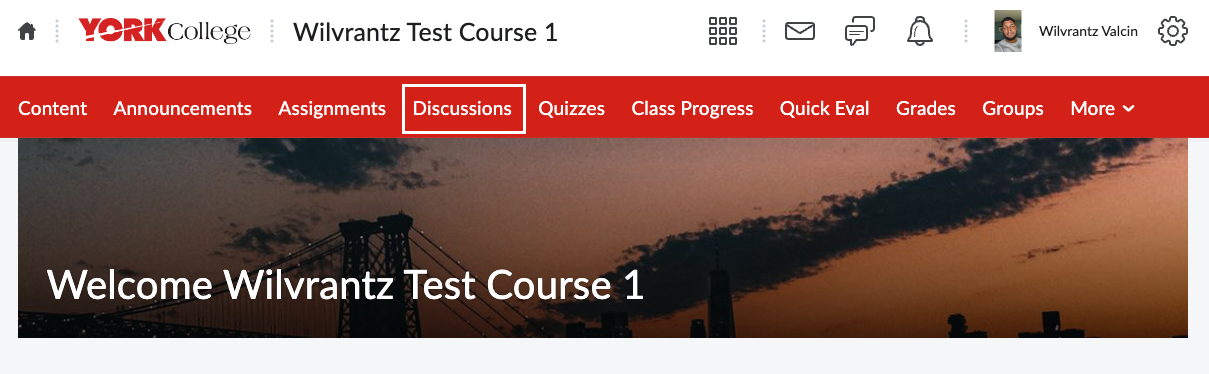
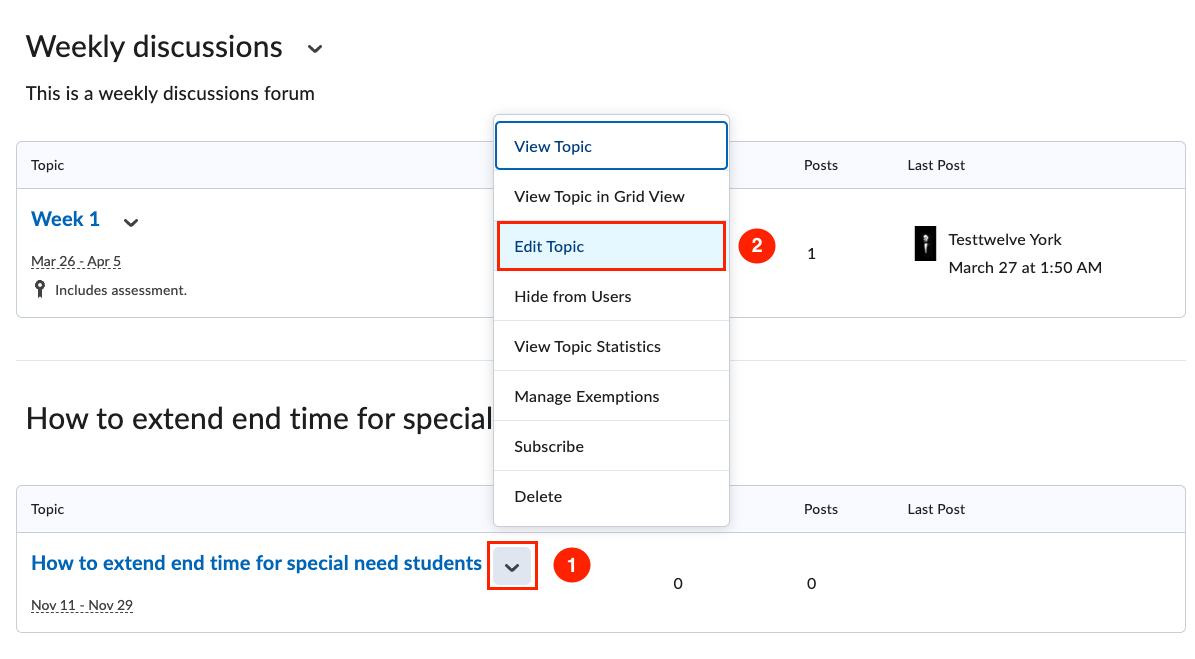
1. On the top navigation bar, click on Discussions, then locate the discussion topic you want to adjust. Click on the down arrow next to the topic and select Edit Topic.


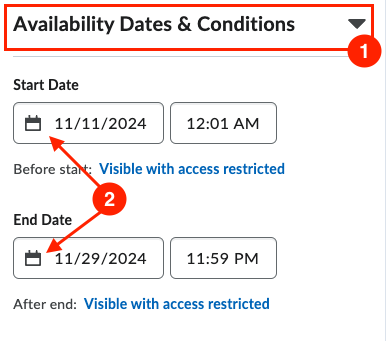
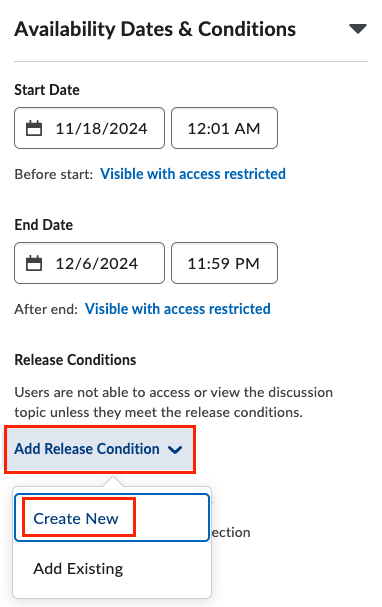
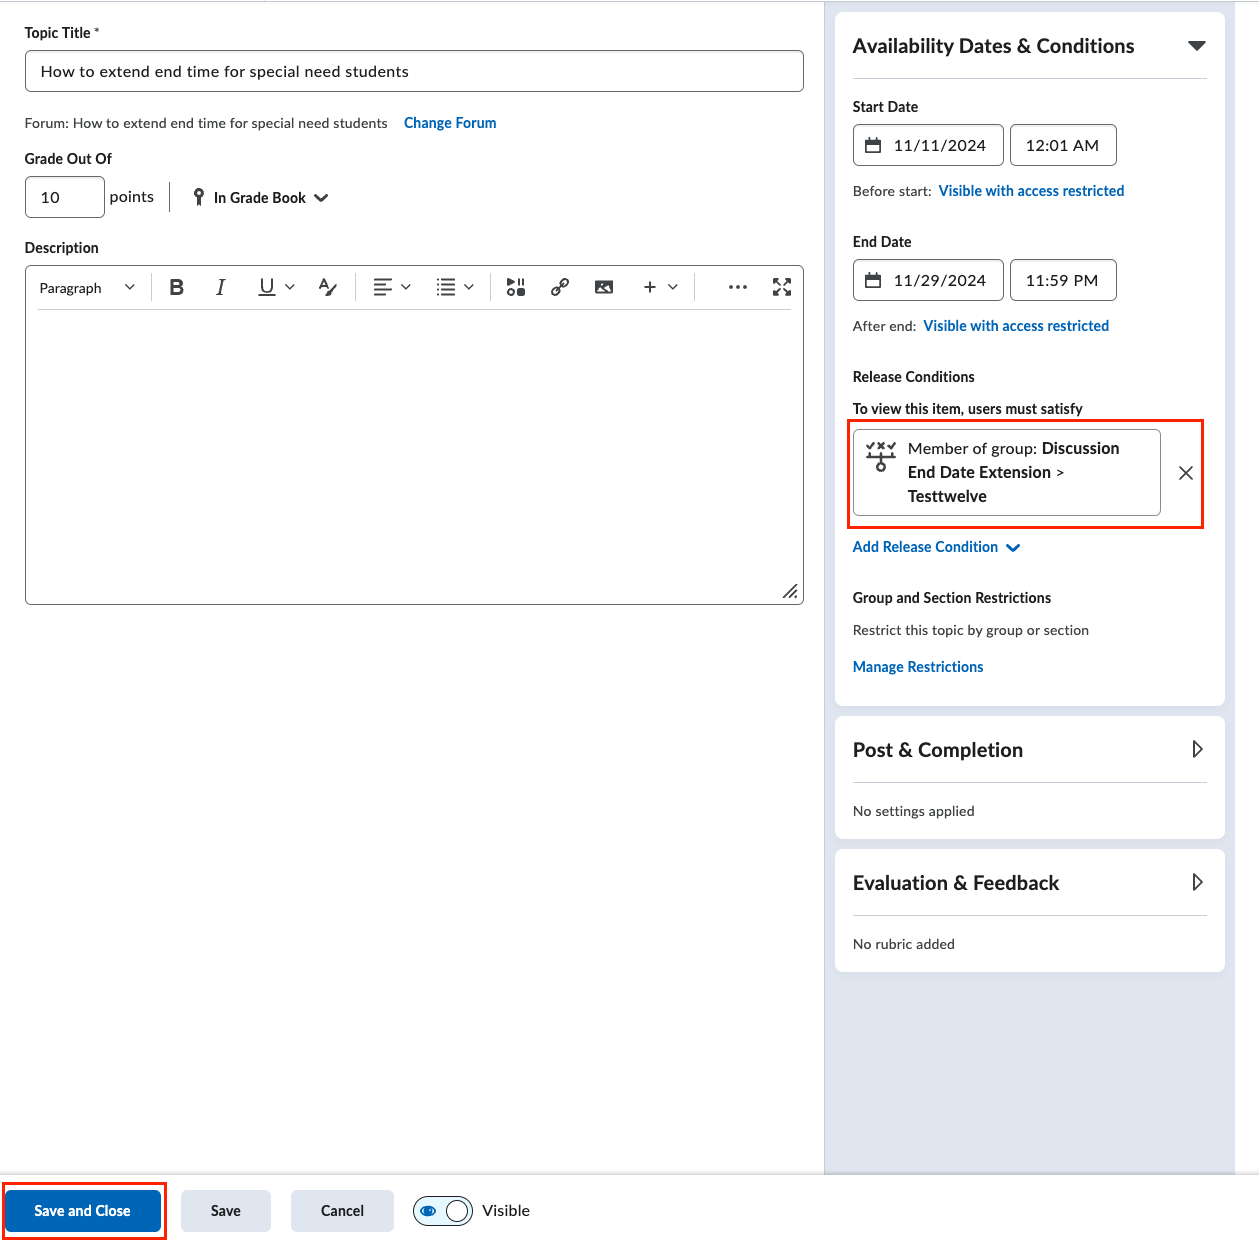
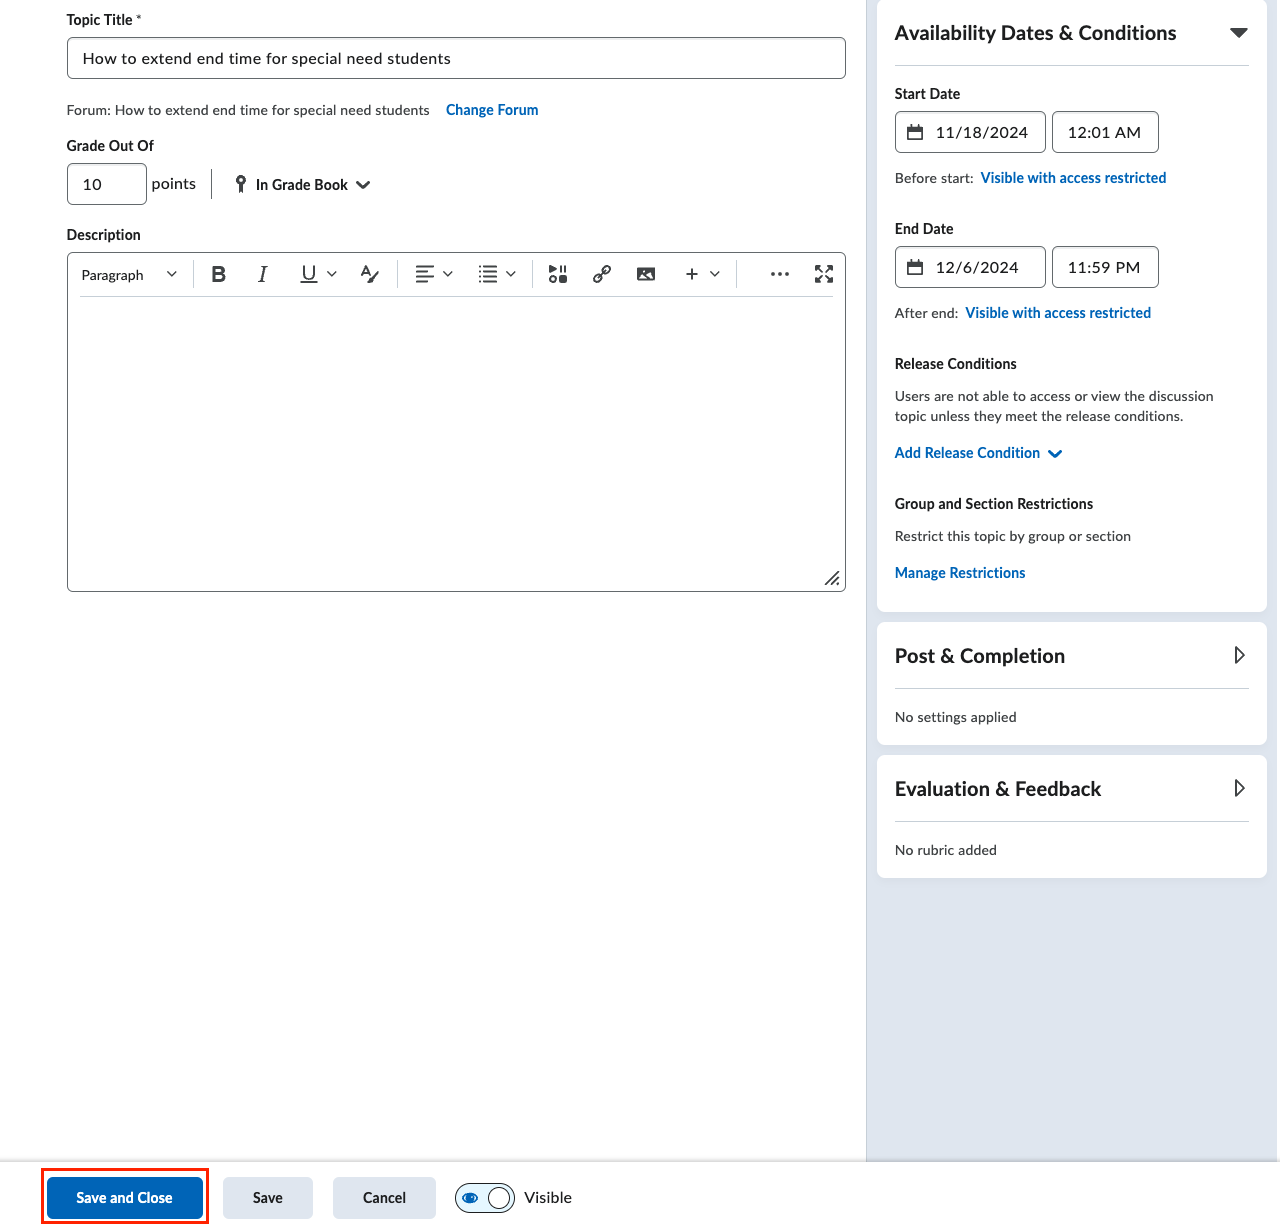
2. You will be redirected to a new window. On the right, click on Availability Dates & Conditions, then update the date to the appropriate extension dates.
Next, go to Add Release Condition and choose Create New.
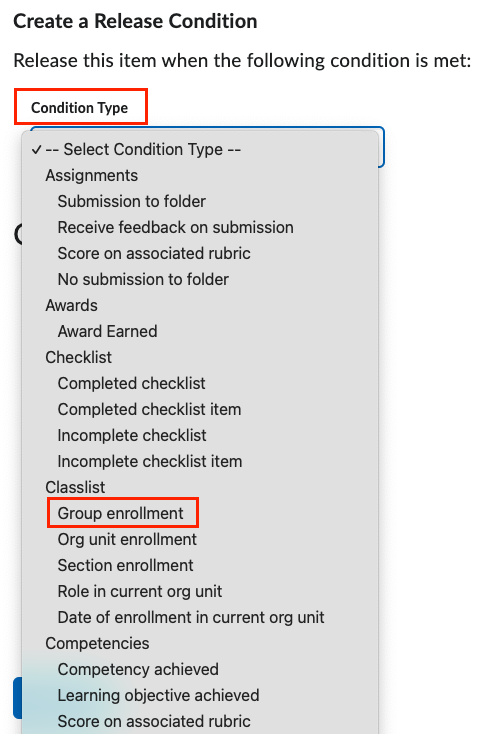
3.In the pop-up window, click the down arrow under Condition Type, scroll down, and select Group Enrollment.
Then, click the down arrow under Group, select the appropriate group for the students needing extra time, which can be named by the student's name (as shown in the screenshot), click Create.
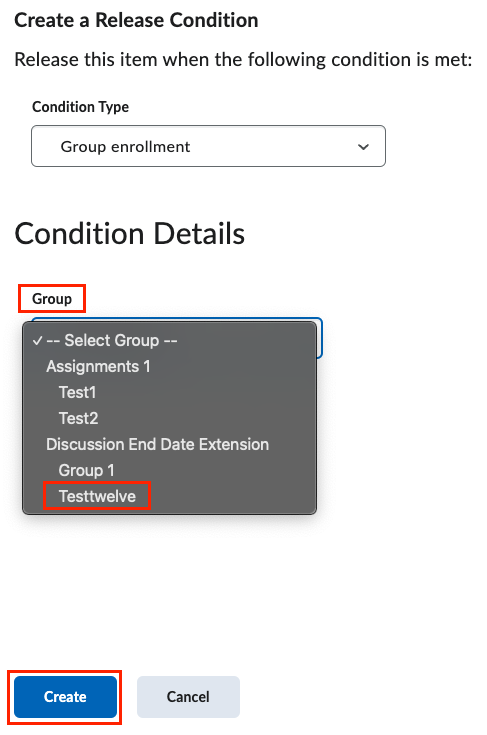
Once you click Create, you will see the release condition on the right. Then, click Save and Close.
4. After the students needing special access have completed their work, you can allow all students in your course to review the discussion topic. Go back to Discussions on the top navigation bar, click the down arrow next to the same topic as before, and select Edit Topic.
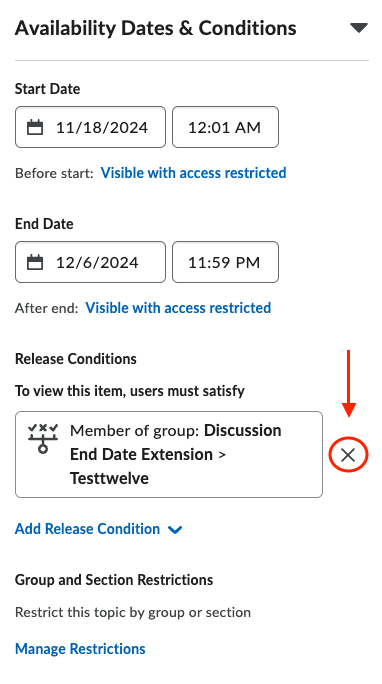
5. Under Availability Dates & Conditions, click the X next to the box under Release Conditions to remove the condition. Then save your changes.
How to enroll a user in an organization
If you are an organization leader, you can enroll users in the organization or a non-official course. by following the steps below.
1. In your organization or non-official course site, go to the Course Admin page (you may need to click More on the top navbar) and click Classlist.
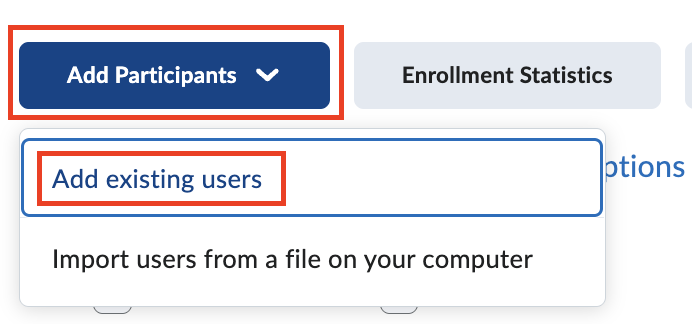
2. Click Add Participants > Add existing users.
3. Type in the empl ID or the name of the user you want to enroll, and press Enter.
Note: if it is a common name, you may get many users. In this case, it is better to use empl ID for searching to avoid enrolling in a wrong user.

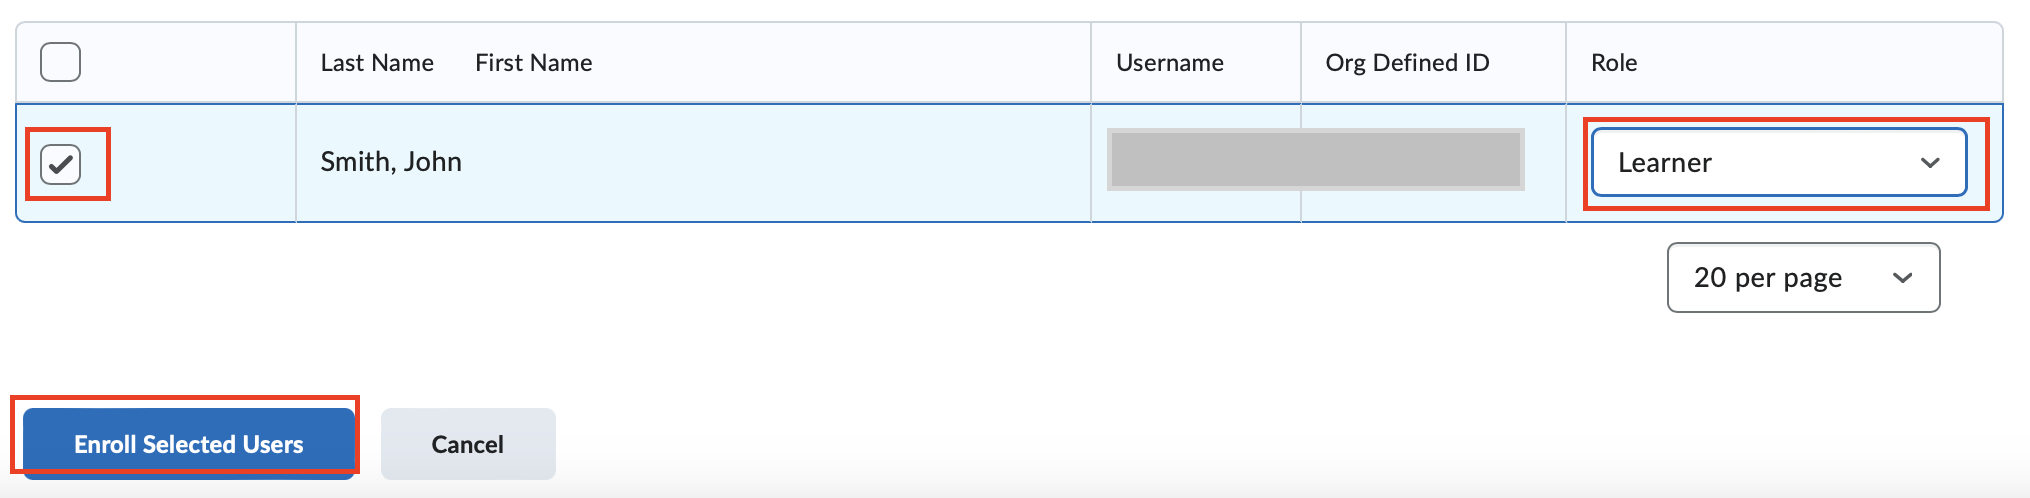
4. After the user is found, check the box on the left of the name, on the Role dropdown box, choose Learner, or any other appropriate role. Then click Enroll Selected Users.
Now the user is enrolled.
What these icons next to my assignments or quizzes mean
You may see some icons next to a quiz or an assignment as shown in a screenshot below. Actually, throughout Brightspaces, there are a lot of icons. What do they mean? Familiarize yourself with some commonly used icons can make you working more efficiently.
Go to Glossary of Icons to find out the meaning of the icons in Brightspace courses.
Revised: December 15, 2025
York College / CUNY
94 - 20 Guy R. Brewer Blvd.
Jamaica, NY 11451
P: 718-262-2000